使い方ガイド
User guide
インストールから初期設定、日々の使い方、ライセンス認証、アンインストールまでを、画面つきで説明します。
From installing and first setup to daily use, license activation and uninstalling, step by step with screenshots.
1. インストール
1. Install
必要な環境:Windows 10 / 11(64ビット)。管理者権限は不要です。印刷用のソフト(SumatraPDF)はインストーラーに同梱されているので、別途用意する必要はありません。
手順1:インストーラーを起動する
- ダウンロードページから
AutoPrint-setup.exeを保存し、ダブルクリックします。 - 「Windows によって PC が保護されました」(SmartScreen)と表示された場合は、「詳細情報」→「実行」を選びます。
autoprint.okadev.jp であることをご確認ください。インストーラーの画面は英語で表示されます(アプリ本体の言語は、初回起動時に選べます)。
手順2:ウィザードを進める
① Welcome(ようこそ):内容を確認して「Next >」を押します。
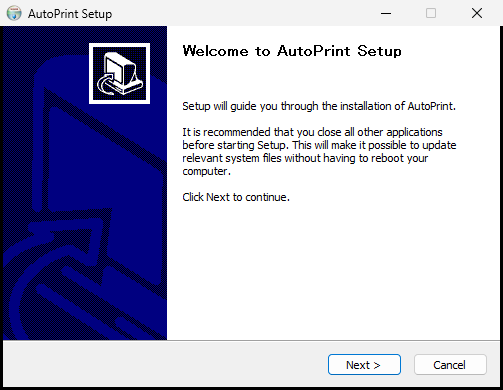
② Choose Install Location(インストール先):通常はそのままで構いません。標準の場所は C:\Users\(ユーザー名)\AppData\Local\AutoPrint です。変える場合は「Browse...」で選び、「Next >」を押します。
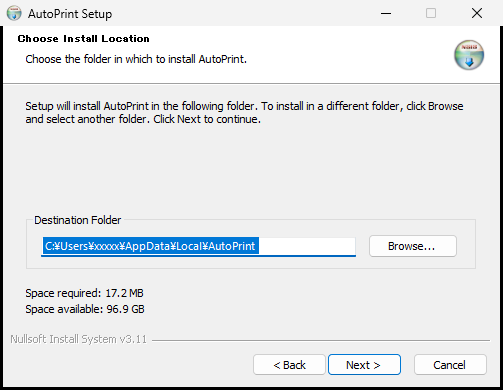
③ Installing(インストール中):数秒でファイルのコピーが終わります。
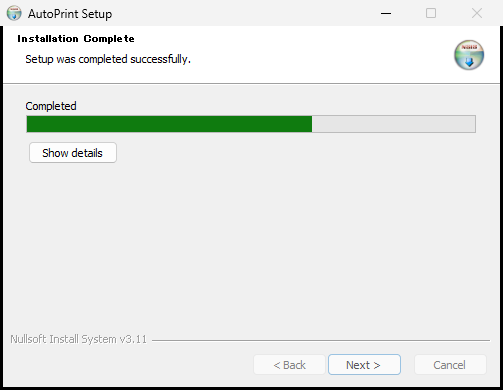
④ Installation Complete(完了):緑のバーが「Completed」になったら、「Next >」を押します。
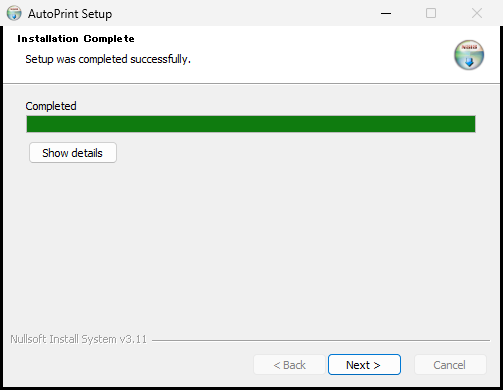
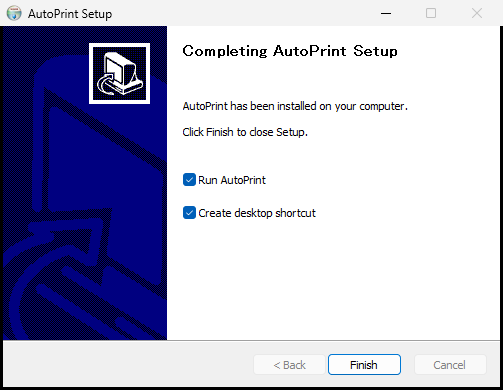
⑤ Completing AutoPrint Setup(最後の画面):2 つのチェックボックスがあります(初期状態はどちらもオン)。
- Run AutoPrint:オンのまま 「Finish」を押すと、アプリがすぐに起動します。
- Create desktop shortcut:デスクトップにショートカットを作ります。不要ならオフにします。
手順3:インストールされたことを確認する
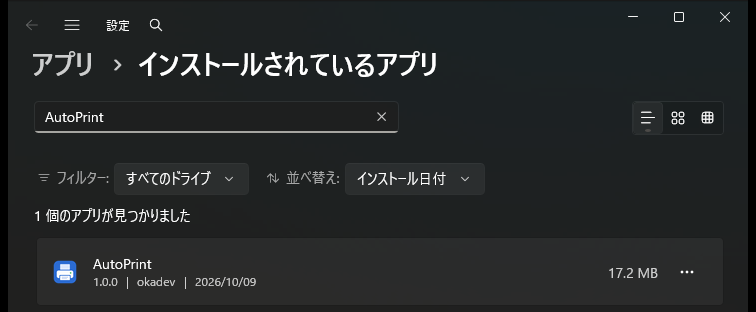
設定 → アプリ → インストールされているアプリを開き、検索欄に「AutoPrint」と入力します。一覧に「AutoPrint」が表示されていれば成功です。スタートメニューにもショートカット「AutoPrint」ができます。
Requirements: Windows 10 / 11 (64-bit). No administrator rights are needed. The printing engine (SumatraPDF) is bundled in the installer, so you do not need to install anything else.
Step 1: Start the installer
- Save
AutoPrint-setup.exefrom the download section and double-click it. - If Windows shows "Windows protected your PC" (SmartScreen), choose "More info" → "Run anyway".
autoprint.okadev.jp.The installer itself is shown in English (the language of the app is chosen on its first launch).
Step 2: Go through the wizard
① Welcome: read it and press "Next >".
② Choose Install Location: the default is fine. It is C:\Users\(your name)\AppData\Local\AutoPrint. To change it, use "Browse...". Then press "Next >".
③ Installing: copying the files takes a few seconds.
④ Installation Complete: when the green bar says "Completed", press "Next >".
⑤ Completing AutoPrint Setup: there are two checkboxes (both on by default).
- Run AutoPrint: leave it on and press "Finish" to start the app right away.
- Create desktop shortcut: adds a shortcut to the desktop. Turn it off if you do not want one.
Step 3: Check that it is installed
Open Settings → Apps → Installed apps and type "AutoPrint" in the search box. If "AutoPrint" is listed, the installation worked. A Start menu shortcut named "AutoPrint" is added too.
2. 初回起動(言語の選択)
2. First launch (choose a language)
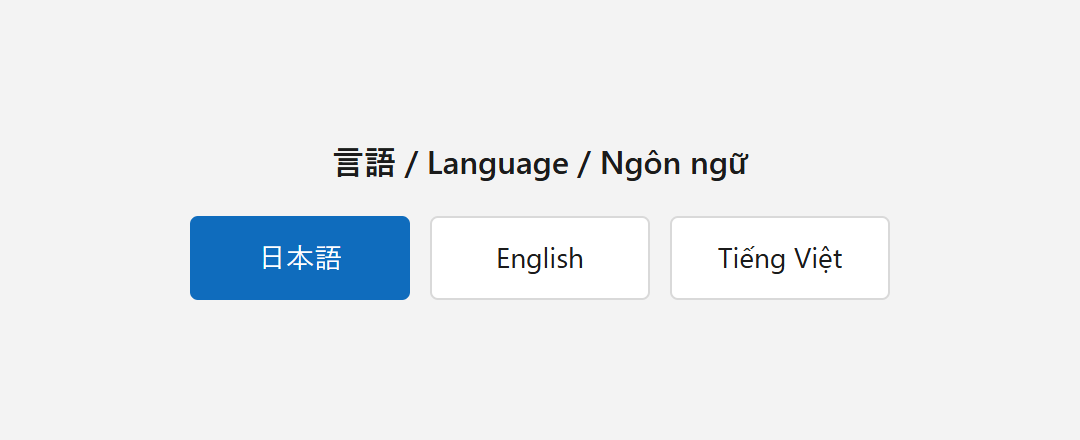
最初の起動時だけ、表示言語を選ぶ画面が出ます。日本語・English・Tiếng Việt から選んでください。あとから「設定」タブでいつでも変更できます。
The first time the app starts, it asks for the display language: Japanese, English or Vietnamese. You can change it later in the Settings tab.
この日から 30日間は Pro 版のすべての機能をお試しいただけます(「6. 体験版とライセンス認証」参照)。
From this day you can use all Pro features for 30 days (see "6. Trial and license activation").
3. フォルダーとプリンターの設定
3. Set up folders and printers
「設定」タブで、どのフォルダーに届いたファイルを、どのプリンターで、何部印刷するかを決めます。
In the Settings tab you decide which folder is watched, which printer prints its files, and how many copies.
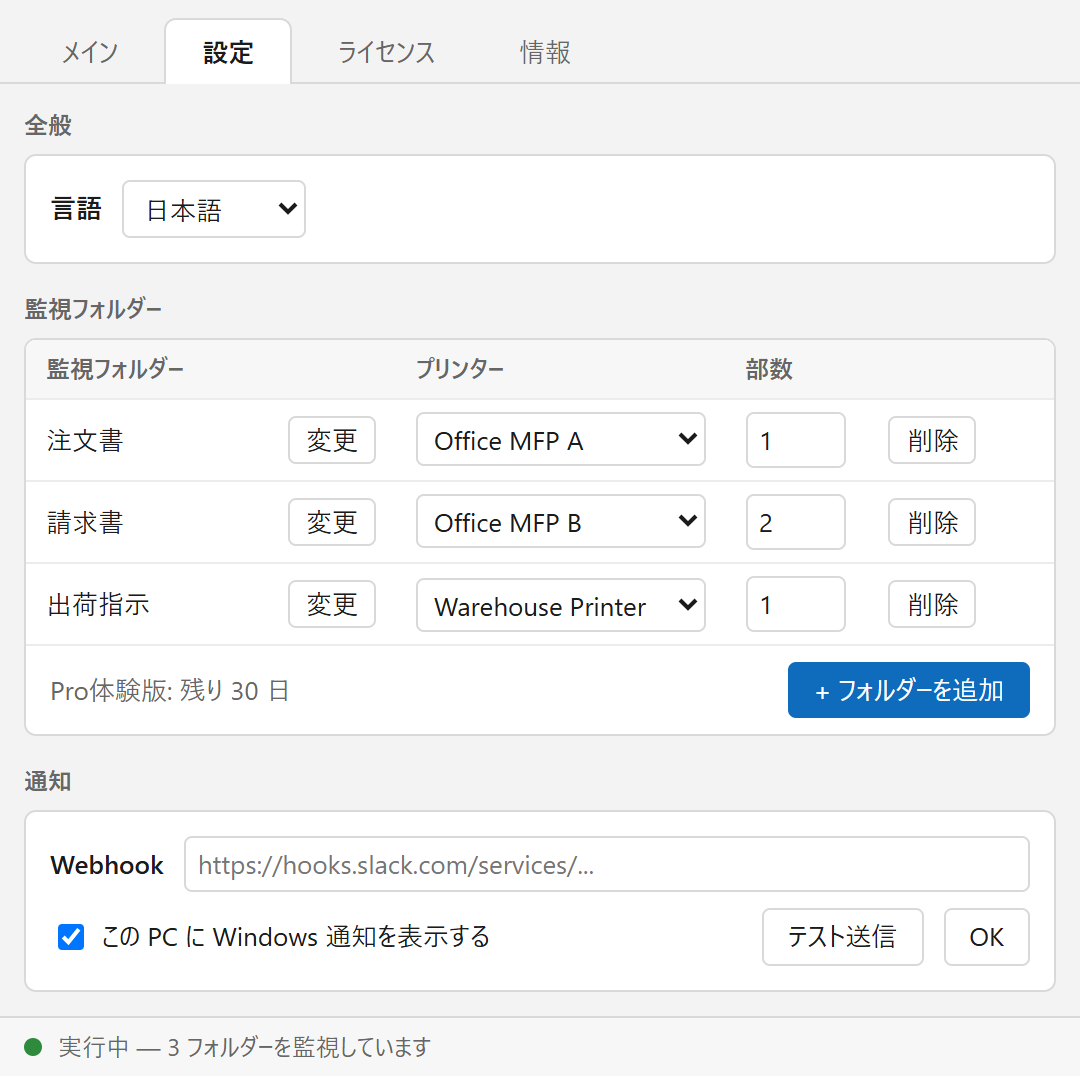
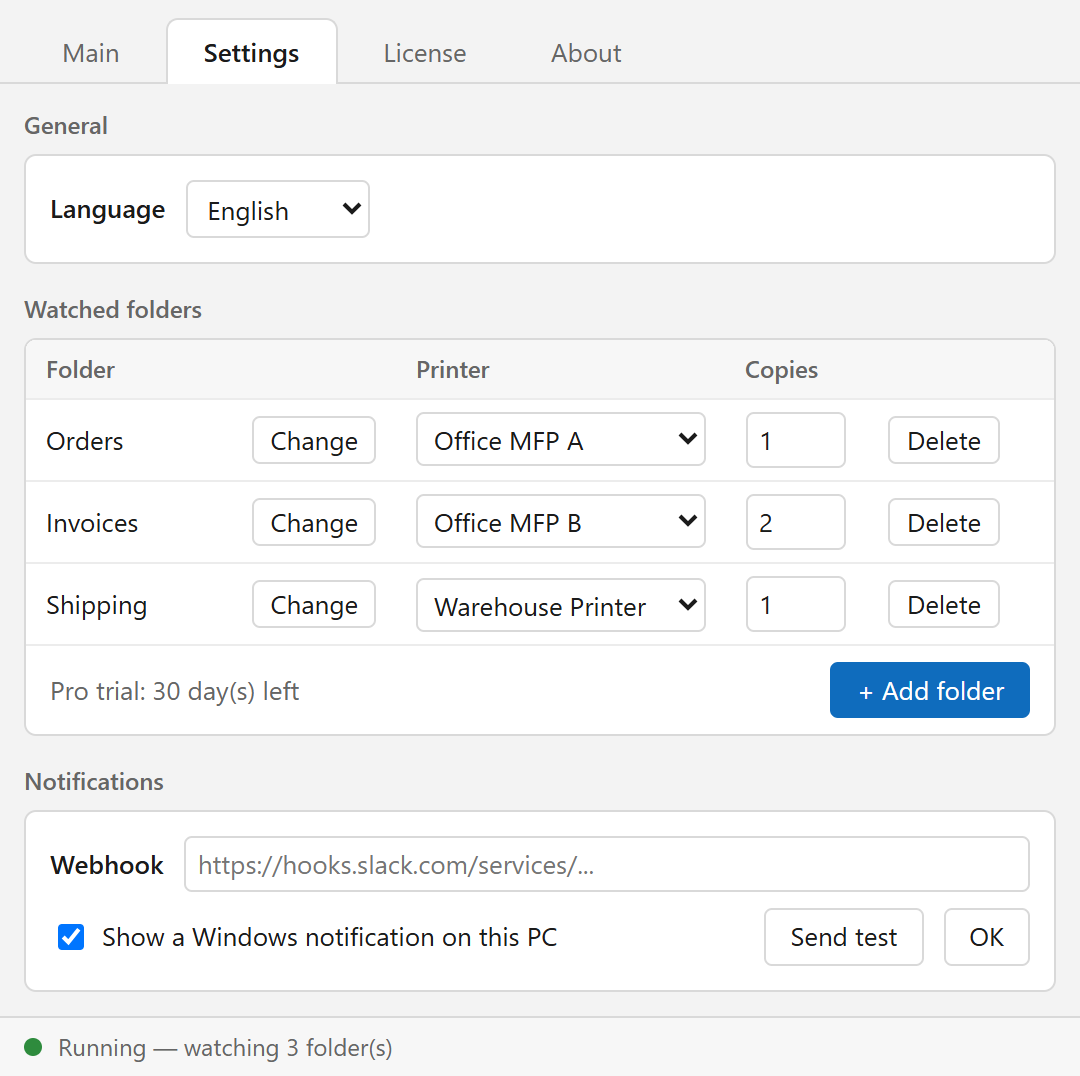
- 「+ フォルダーを追加」を押すと、新しい行が追加されます。
- 行の「選択...」を押し、印刷したいファイルが届くフォルダーを選びます。
- プリンターの一覧から、印刷に使うプリンターを選びます。(Microsoft Print to PDF などの仮想プリンターは一覧に出ません。)
- 部数を入力します(1〜99)。
- 変更はその場で自動保存され、すぐに監視が始まります。画面下に「実行中 — 3 フォルダーを監視しています」と出れば準備完了です。
- Press "+ Add folder" to add a row.
- Press "Choose..." on the row and pick the folder where files to print will arrive.
- Pick the printer from the Printer list. (Virtual printers such as Microsoft Print to PDF are not listed.)
- Enter the number of copies (1–99).
- Changes are saved immediately and watching starts at once. When the bottom bar says "Running — watching 3 folder(s)", you are ready.
4. 印刷のしかたと結果の確認
4. Printing and checking results
印刷する
監視フォルダーにファイルを入れる(コピーまたは保存する)だけです。自動的に、設定したプリンターで印刷されます。印刷できる形式は PDF、JPG、PNG、BMP、GIF、TIFF です。
Just put (copy or save) a file into a watched folder and it is printed automatically on the configured printer. Supported formats: PDF, JPG, PNG, BMP, GIF, TIFF.
結果の保存先
Where results go
監視フォルダーの中に、次のフォルダーが自動で作られます。
The following folders are created automatically inside each watched folder.
| 場所 | Location | 内容 | Contents |
|---|---|---|---|
_printed\20261101\ | 印刷に成功したファイル(日付ごと)。同じ名前でも上書きされません。 | Files printed successfully, by date. Files with the same name are never overwritten. | |
_failed\ | 印刷に失敗したファイル。原因は下のログに記録されます。 | Files that failed to print. The reason is written to the log below. | |
_log\20261101.csv | 1 日 1 ファイルの印刷ログ(日付・時刻・ファイル名・結果・エラー)。Excel でそのまま開けます。 | One print log per day (date, time, file name, result, error). Opens directly in Excel. |
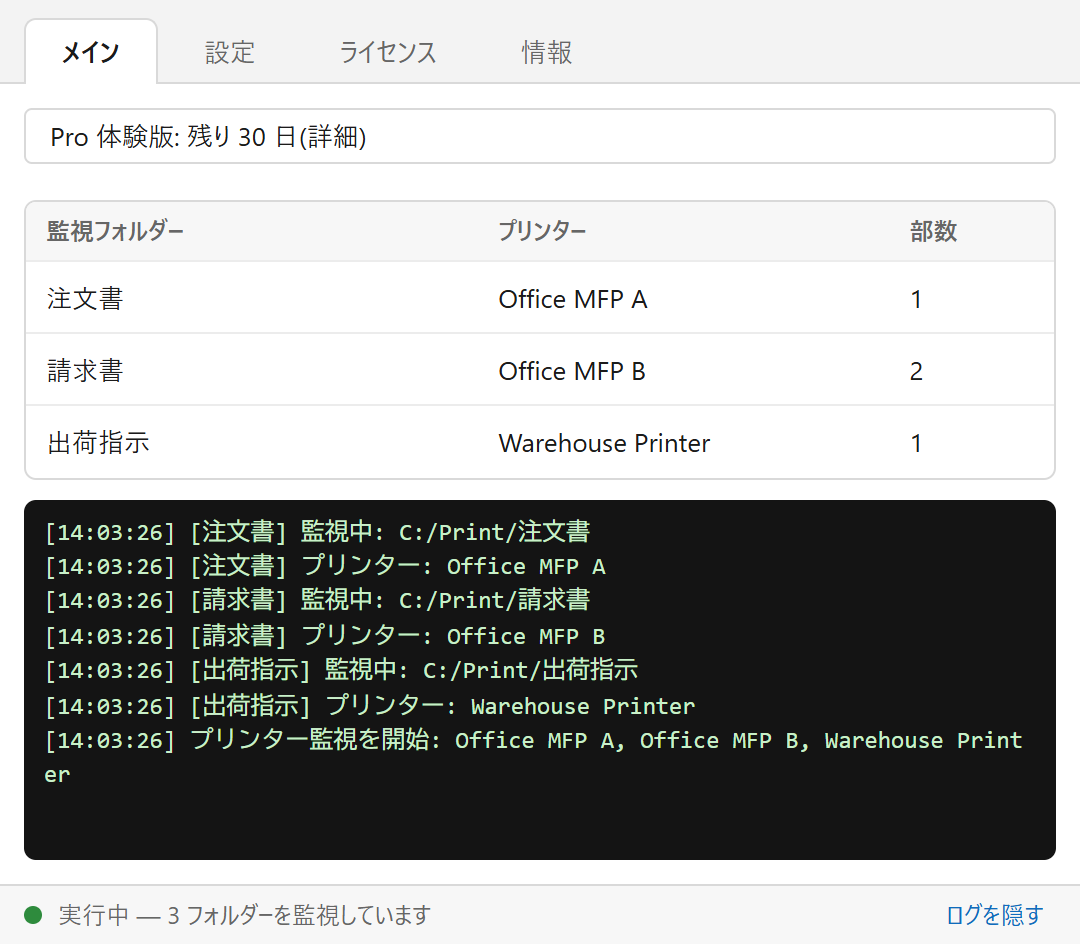
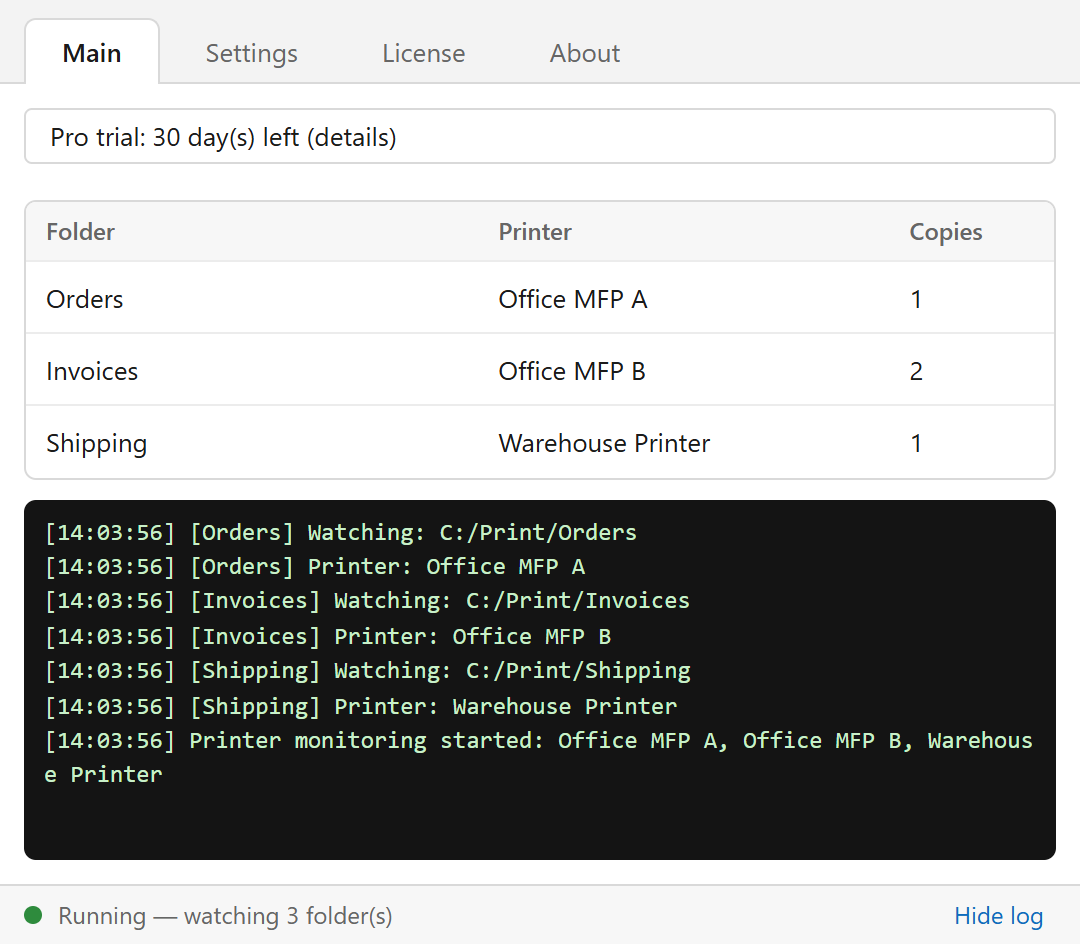
「メイン」タブで状況を見る
Watch the status in the Main tab
5. 通知(Windows 通知・Webhook)
5. Notifications (Windows toast, webhook)
プリンターがオフラインになった、エラーになった、印刷ジョブが詰まった、といった異常を検知すると、次の方法でお知らせします。通知は Free 版でも使えます。
When a printer goes offline, reports an error or has a stuck job, you are notified in the ways below. Notifications are available in the Free edition too.
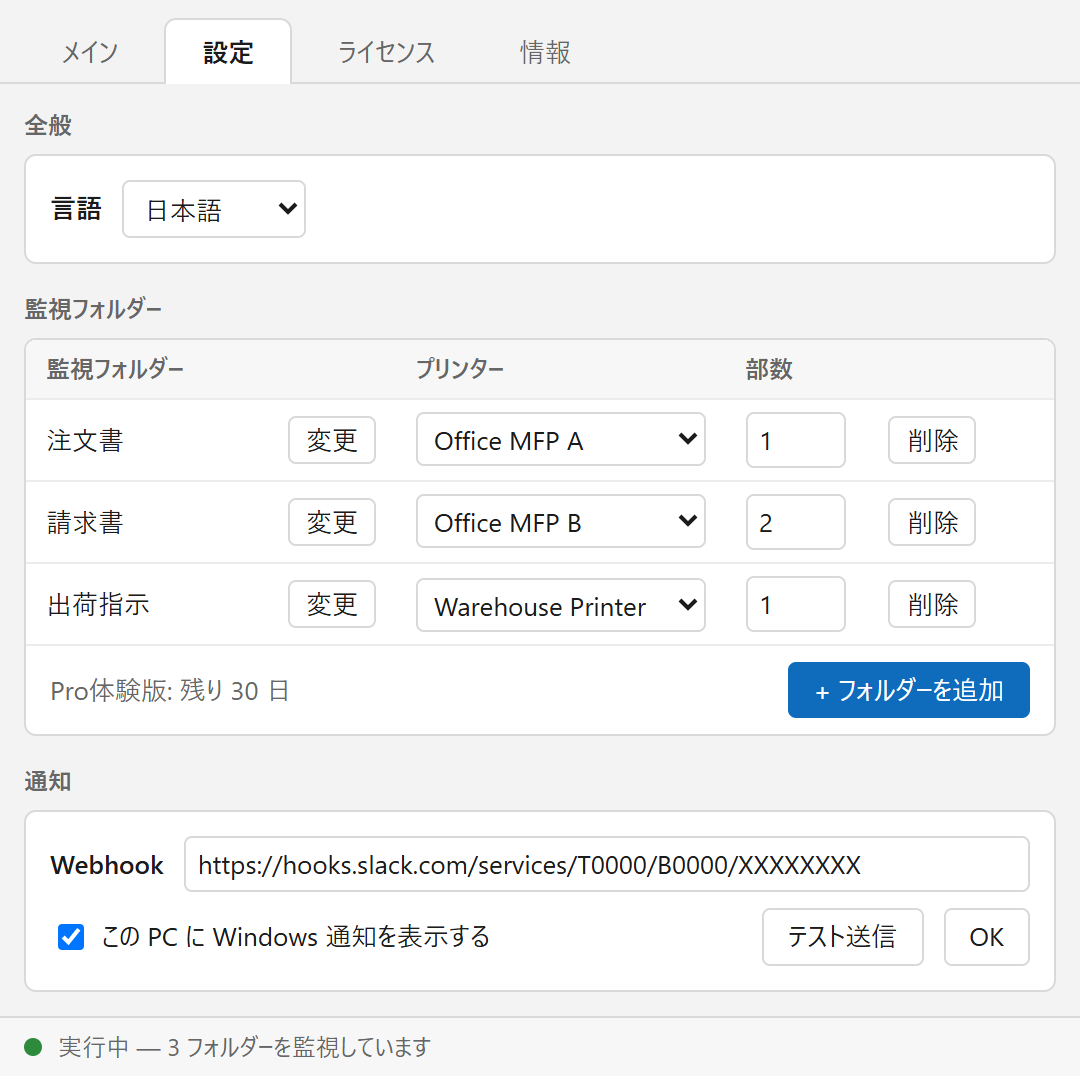
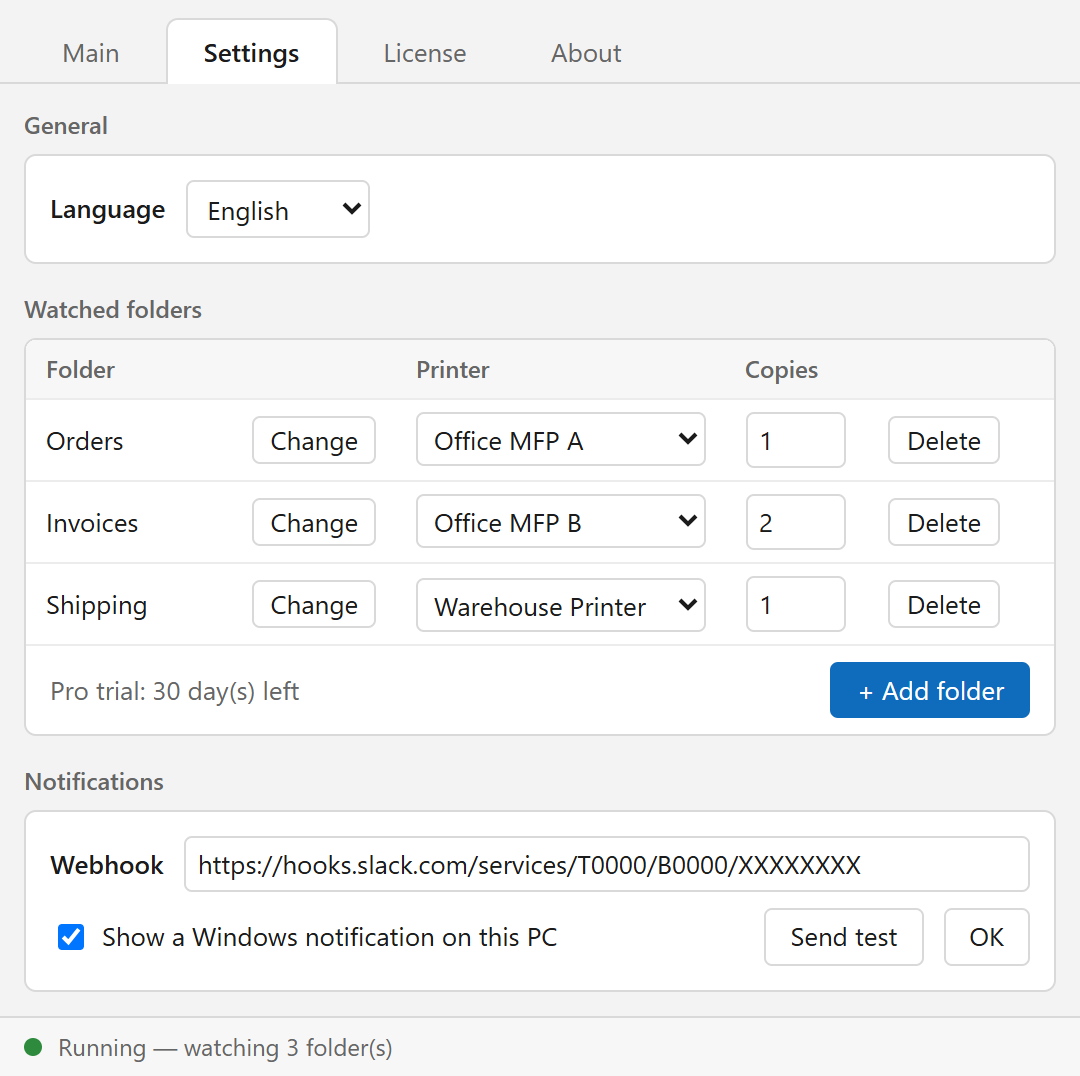
- この PC に Windows 通知を表示する:チェックを入れると、PC の画面に通知が出ます(初期設定はオン)。
- Webhook:Slack、Google Chat、Discord などの Incoming Webhook の URL を貼り付けます。席を離れていても、チャットで異常に気づけます。
- 入力したら 「テスト送信」でテスト通知を送り、届くことを確認してから 「OK」で保存してください。
- Show a Windows notification on this PC: when checked, alerts pop up on the PC (on by default).
- Webhook: paste an Incoming Webhook URL from Slack, Google Chat, Discord, etc. You will see problems in chat even when you are away from the PC.
- After entering it, press "Send test" to confirm the message arrives, then press "OK" to save.
6. 体験版とライセンス認証
6. Trial and license activation
30日間の Pro 体験
30-day Pro trial
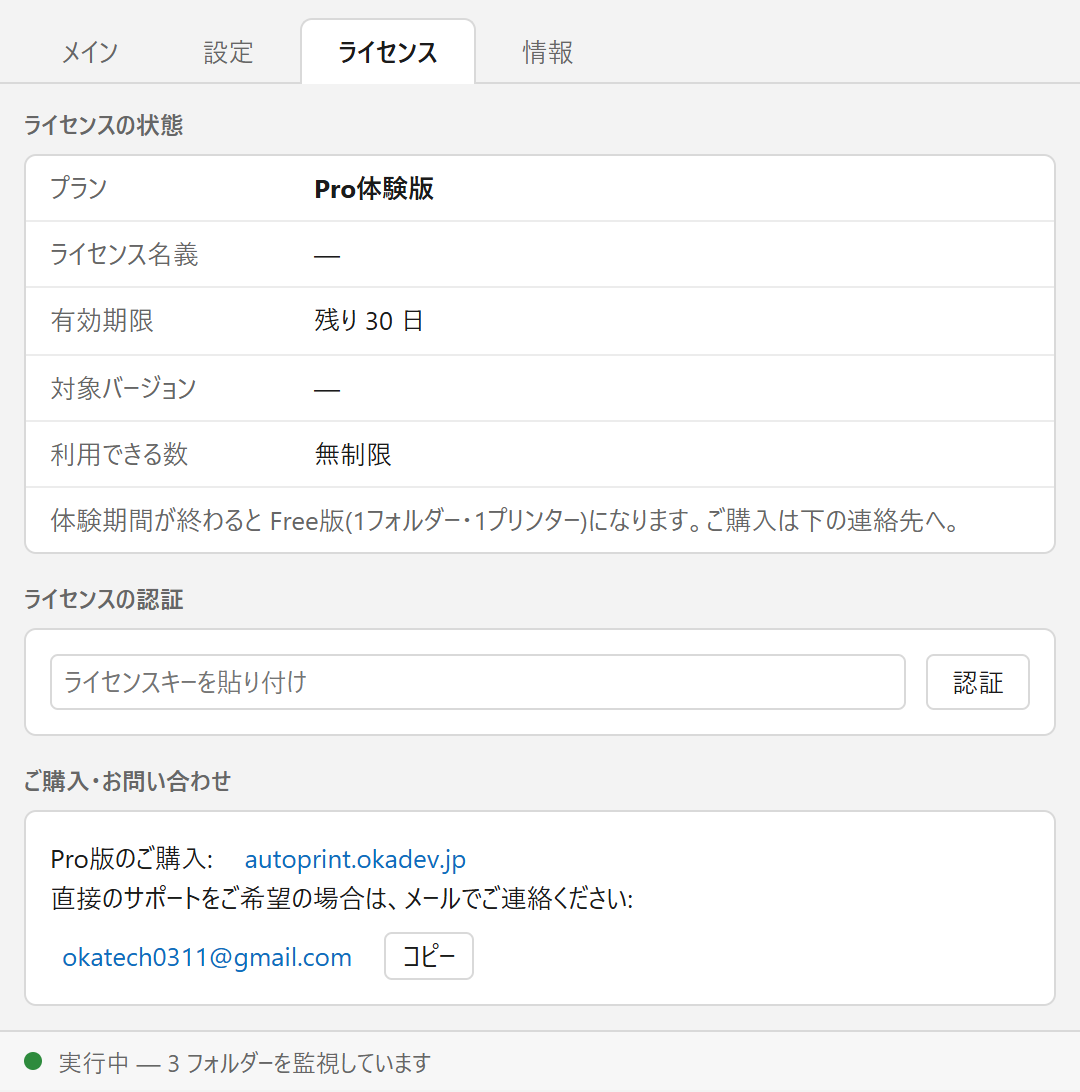
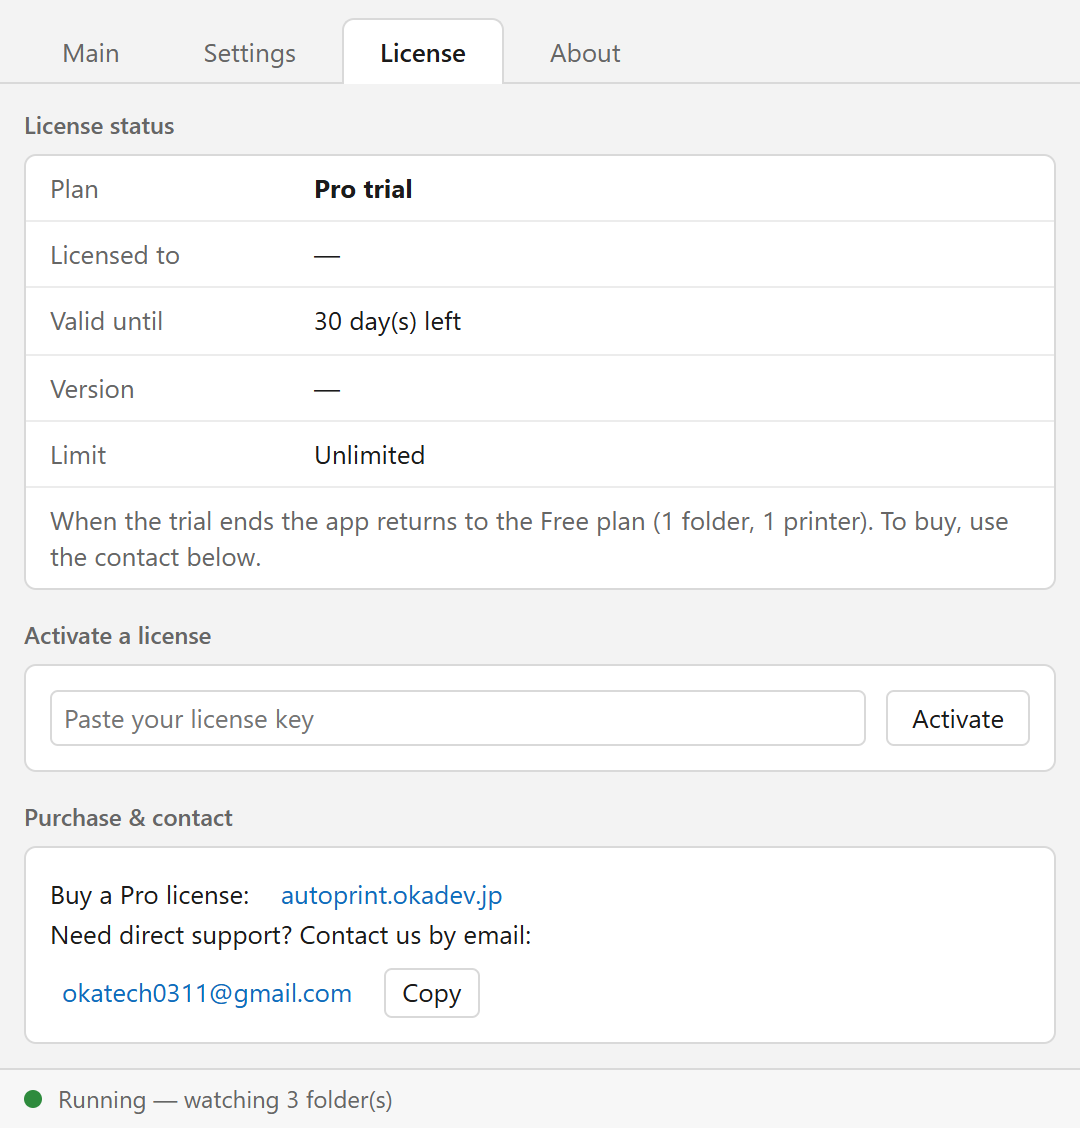
初めて起動した日から 30日間は、Pro 版の機能(フォルダー・プリンターの数に制限なし)をそのまま使えます。残り日数は「メイン」タブの上部と「ライセンス」タブに表示されます。
For 30 days from the first launch, all Pro features (no limit on folders or printers) are available. The days left are shown at the top of the Main tab and in the License tab.
Pro 版の購入とライセンス認証
Buying Pro and activating the license
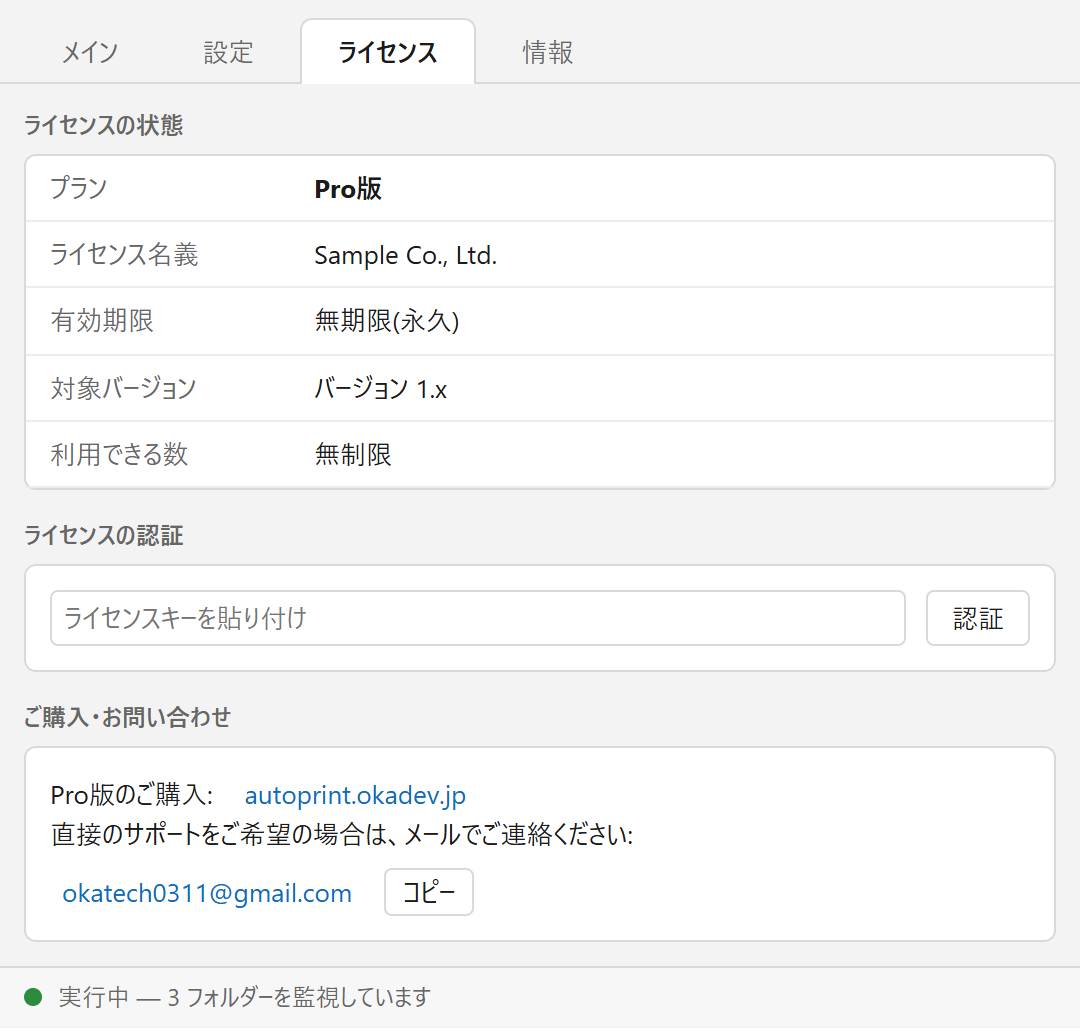
- 「ライセンス」タブの「ご購入」のリンク(または 料金ページ)から購入します。買い切りで、購入したメジャーバージョン(1.x)では期限なく使えます。
- 購入後、メールでライセンスキーが届きます。
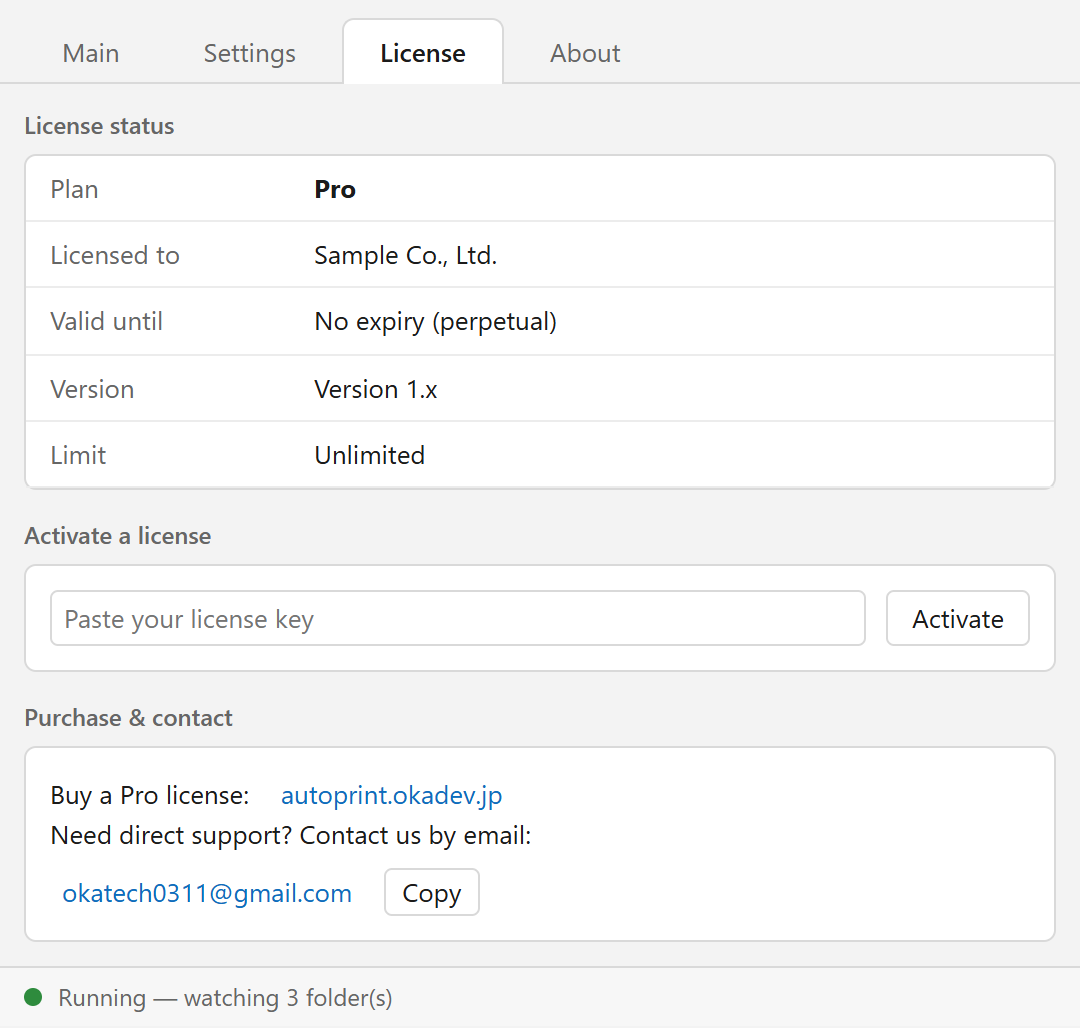
- 「ライセンス」タブの入力欄にキーを貼り付け、「認証」を押します。
- プランが「Pro版」に変わり、ライセンス名義・有効期限(無期限)・対象バージョンが表示されれば完了です。
- Buy using the "Buy a Pro license" link in the License tab (or the pricing page). It is a one-time purchase, valid without time limit for the major version bought (1.x).
- After purchase, the license key arrives by email.
- Paste the key into the field in the License tab and press "Activate".
- When the plan changes to "Pro" and the licensee, validity (no expiry) and version are shown, you are done.
ライセンスの認証はインターネットに接続しなくても行えます。キーの紛失・再発行は、メール(okatech0311@gmail.com)でご連絡ください。
Activation works without an internet connection. If you lose your key, email okatech0311@gmail.com and we will re-send it.
7. タスクトレイと自動起動
7. Tray icon and auto start
- ウィンドウの × を押しても終了せず、タスクトレイ(画面右下)に常駐して監視を続けます。
- トレイのアイコンを左クリックするとウィンドウが開きます。右クリックのメニューから「設定...」を開くか、「終了」でアプリを完全に終了できます。
- Windows にサインインすると自動で起動します。PC を再起動しても監視は再開されます。
- アプリを二重に起動することはできません(同じファイルが二重に印刷されるのを防ぐため)。
- Pressing the window's × does not quit the app. It keeps watching from the system tray (bottom-right of the screen).
- Left-click the tray icon to open the window. Right-click it to open "Settings..." or choose "Quit" to exit completely.
- The app starts automatically when you sign in to Windows, so watching resumes after a restart.
- The app cannot be started twice (to prevent the same file from printing twice).
8. アンインストール
8. Uninstall
- タスクトレイのアイコンを右クリックして「終了」を選び、アプリを終了します。
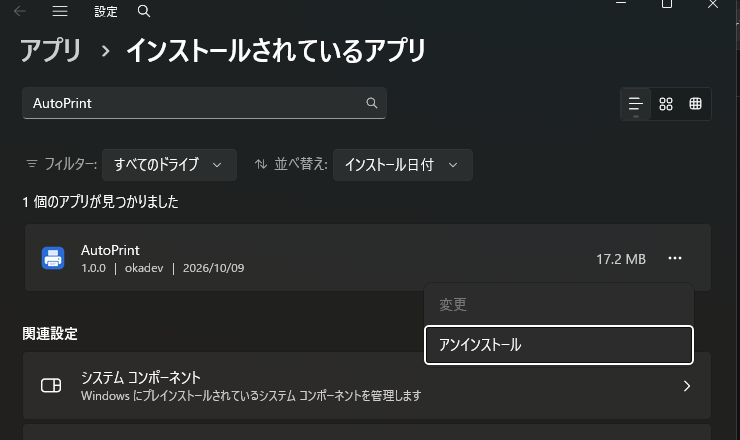
- 設定 → アプリ → インストールされているアプリを開き、検索欄に「AutoPrint」と入力します。
- 「AutoPrint」の右にある「…」を押し、「アンインストール」を選びます(「変更」は使えません)。
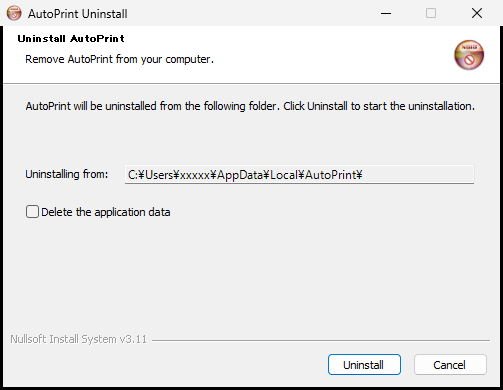
- 「AutoPrint Uninstall」の画面が開きます。「Delete the application data」(アプリのデータを削除する)のチェックは、次のとおりです。
- オフ(初期状態):設定(フォルダー・プリンター・Webhook・ライセンスキー)が残るので、再インストール後もそのまま使えます。
- オン:設定もすべて削除します。
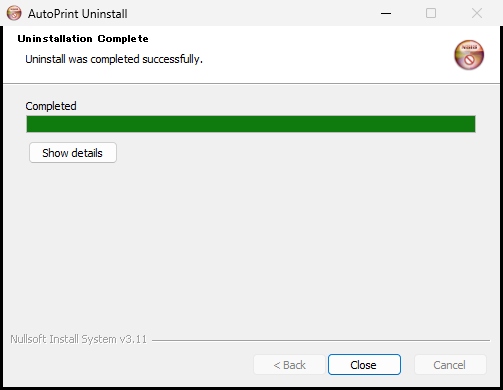
- 「Uninstallation Complete」と表示されたら、「Close」を押して完了です。Windows 起動時の自動起動の登録も、いっしょに解除されます。
_printed・_failed・_log と、印刷済みファイル・ログは、アンインストールしても削除されません。不要であればご自身で削除してください。なお、体験期間の記録(開始日)は残るため、再インストールしても 30 日の体験は最初からにはなりません。- Right-click the tray icon and choose "Quit" to exit the app.
- Open Settings → Apps → Installed apps and type "AutoPrint" in the search box.
- Press the "…" button to the right of "AutoPrint" and choose "Uninstall" ("Modify" is not available).
- The "AutoPrint Uninstall" window opens. The "Delete the application data" checkbox works like this:
- Off (default): your settings (folders, printers, webhook, license key) are kept, so they are still there if you reinstall.
- On: your settings are deleted too.
- When it says "Uninstallation Complete", press "Close". The entry that starts the app with Windows is removed as well.
_printed, _failed and _log folders inside your watched folders, with the printed files and logs, are left untouched. Delete them yourself if you no longer need them. The trial record (start date) is also kept, so reinstalling does not restart the 30-day trial.9. 困ったときは
9. Troubleshooting
| 症状 | Problem | 確認すること | What to check |
|---|---|---|---|
| ファイルを入れても印刷されない | A file is added but nothing prints | 画面下が「実行中」になっているか。拡張子が対応形式か。フォルダーとプリンターの両方が選ばれているか(「(未選択)」の行は動作しません)。体験期間が終了している場合は、2 行目以降が一時停止になっていないか。 | Is the bottom bar "Running"? Is the file type supported? Are both folder and printer chosen (rows showing "(not set)" do not run)? If the trial has ended, are rows after the first paused? |
ファイルが _failed に入った | A file ended up in _failed |
「メイン」タブの「ログを表示」か、_log の CSV に原因が書かれています。プリンターの電源・接続・用紙を確認し、ファイルを監視フォルダーに入れ直してください。 |
The reason is in the Main tab log ("Show log") or the CSV in _log. Check the printer's power, connection and paper, then put the file back into the watched folder. |
| プリンターが一覧に出ない | A printer is not in the list | Windows の「プリンターとスキャナー」に追加されているか確認してください。Microsoft Print to PDF などの仮想プリンターは対象外です。 | Make sure it is added in Windows "Printers & scanners". Virtual printers such as Microsoft Print to PDF are not supported. |
| 通知が届かない | No notifications arrive | 「設定」タブの「テスト送信」を押して確認してください。Webhook の URL が正しいか、Windows の通知(集中モードなど)がオフになっていないかも確認してください。 | Press "Send test" in the Settings tab. Also check that the webhook URL is correct and that Windows notifications (e.g. Focus assist) are not turned off. |
| ライセンスキーが認証できない | The license key is rejected | キーの前後に空白や改行が入っていないか、途中で切れていないか確認してください。「古いバージョン用です」と出る場合は、新しいバージョン用のキーが必要です。 | Check for stray spaces or line breaks, and that the whole key was copied. "For an older version" means this version needs a newer key. |
解決しない場合は、okatech0311@gmail.com まで、画面の写真かログとあわせてご連絡ください。
If the problem remains, email okatech0311@gmail.com with a screenshot or the log.